Testomat.io Java Reporter
What is this?
Section titled “What is this?”This is the official Java reporter for Testomat.io - a powerful test management platform.
It automatically sends your test results to the platform, giving you comprehensive reports, analytics,
and team collaboration features.
🔄 Current Status & Roadmap
Section titled “🔄 Current Status & Roadmap”🚧 Actively developed - New features added regularly!
Features
Section titled “Features”| Feature | Description | JUnit | TestNG | Cucumber |
|---|---|---|---|---|
| Complete framework integration | Full framework support and compatibility | ✅ | ✅ | ✅ |
| Autostart on tests run | Automatic integration with test execution | ✅ | ✅ | ✅ |
| Shared run | Collaborative test execution sharing | ✅ | ✅ | ✅ |
| Test runs grouping | Organize and categorize test executions | ✅ | ✅ | ✅ |
| Public sharable link | Generate public URLs for test run results | ✅ | ✅ | ✅ |
| Test code export | Export test code from codebase to platform | ✅ | ✅ | ✅ |
| Advanced error reporting | Detailed test failure/skip descriptions | ✅ | ✅ | ✅ |
| TestId import | Import test IDs from testomat.io into the codebase | ✅ | ✅ | ✅ |
| Test filter by ID | Run tests filtered by IDs | ✅ | ✅ | ✅ |
| Parametrized tests support | Enhanced support for parameterized testing | ✅ | ✅ | ✅ |
| Test artifacts support | Screenshots, logs, and file attachments | ✅ | ✅ | ✅ |
| Step-by-step reporting | Detailed test step execution tracking | ✅ | ✅ | ✅ |
| Custom hooks | Allows user’s own reporting enhancements | ✅ | ✅ | ✅ |
| Other frameworks support | Karate, Gauge, etc. (Priority may change) | ⏳ | ⏳ | ⏳ |
🖥️ Supported test frameworks versions
Section titled “🖥️ Supported test frameworks versions”| What you need | Version | We tested with |
|---|---|---|
| JUnit | 5.x | 5.9.2 |
| TestNG | 7.x | 7.7.1 |
| Cucumber | 7.x | 7.14.0 |
Supported Java 11+
Common setup for all frameworks:
Section titled “Common setup for all frameworks:”-
Add the latest version of the dependency to your POM.xml:
TestNG
JUnit
Cucumber -
Get your API key from Testomat.io (starts with
tstmt_) -
Set your API key as environment variable:
Terminal window export testomatio=tstmt_your_key_here- Or add to the
testomatio.properties:
testomatio=tstmt_your_key_hereOr provide it as a JVM property on run via -D flag.
- Or add to the
-
Also provide run title in the
testomatio.run.titleproperty, otherwise runs will have the name “Default Test Run”. -
IMPORTANT: The reporter will run automatically if the API_KEY is provided in any way! To disable, use
testomatio.reporting.disable=1.
Framework specific setup
Section titled “Framework specific setup”Step 1: Create file src/main/resources/junit-platform.properties
Step 2: Add this single line:
junit.jupiter.extensions.autodetection.enabled=trueTestNG
Section titled “TestNG”No additional actions needed as TestNG handles the extension implicitly.
Cucumber
Section titled “Cucumber”Add io.testomat.cucumber.listener.CucumberListener as @ConfigurationParameter value to your TestRunner class.
Like this:
@ConfigurationParameter(key = PLUGIN_PROPERTY_NAME, value = "pretty, io.testomat.cucumber.listener.CucumberListener")Test codebase sync
Section titled “Test codebase sync”For proper usage of this library it is strongly recommended to sync your test codebase with Testomat.io base.
JUnit, TestNG
Section titled “JUnit, TestNG”For this purpose you can use the Java-Check-Tests CLI. What this is for:
- Import your test source code to Testomat.io
- Sync test IDs between Testomat.io project and your codebase
- Remove test IDs and related imports if you need to
Use these one-liners to download jar and update IDs in one move:
UNIX, MACOS:
export TESTOMATIO_URL=... && \export TESTOMATIO=... && curl -L -O https://github.com/testomatio/java-check-tests/releases/latest/download/java-check-tests.jar && java -jar java-check-tests.jar update-ids
WINDOWS cmd:
set TESTOMATIO_URL=...&& set TESTOMATIO=...&& curl -L -O https://github.com/testomatio/java-check-tests/releases/latest/download/java-check-tests.jar&& java -jar java-check-tests.jar update-ids
Where TESTOMATIO_URL is server URL and TESTOMATIO is your project API key.
Be careful with whitespaces in the Windows command.
For more details please read the description of full CLI functionality here:
https://github.com/testomatio/java-check-tests
For most cases, the library is ready to use with this setup
Configuration Options
Section titled “Configuration Options”Required Settings
Section titled “Required Settings” # Your Testomat.io project API key (find it in your project settings)testomatio=tstmt_your_key_hereOr provide it as JVM property or ENV variable.
IMPORTANT: The reporter will run automatically if the API_KEY is provided in any way!
Customization
Section titled “Customization”Here are the options to customize the reporting in the way you need:
| Setting | What it does | Default | Example |
|---|---|---|---|
testomatio.reporting.disable | Disables reporting | none | true / 1 |
testomatio.run.title | Custom name for your test run | default_run_title | "Nightly Regression Tests" |
testomatio.env | Environment name (dev, staging, prod) | (none) | "staging" |
testomatio.run.group | Group related runs together | (none) | "sprint-23" |
testomatio.publish | Make results publicly shareable | (private) | Any not null/empty/“0” string, “0” to disable |
🔗 Advanced Integration
Section titled “🔗 Advanced Integration”| Setting | What it does | Example |
|---|---|---|
testomatio.url | Custom Testomat.io URL (for enterprise) | https://app.testomat.io/ |
testomatio.run.id | Add results to existing run | "run_abc123" |
testomatio.create | Auto-create missing tests in Testomat.io | true / 1 |
testomatio.shared.run | Shared run name for team collaboration | any_name |
testomatio.shared.run.timeout | How long to wait for shared run | 3600 / 1 |
testomatio.export.required | Exports your tests code to Testomat.io | true / 1 |
🏷️ Test Identification & Titles
Section titled “🏷️ Test Identification & Titles”Connect your code tests directly to your Testomat.io test cases using simple annotations! As mentioned above, test IDs are recommended to be synced with Java-Check-Tests CLI. But @Title usage is up to you.
📋 For JUnit & TestNG
Section titled “📋 For JUnit & TestNG”Use @TestId and @Title annotations to make your tests perfectly trackable:
💡 Tip: With
@TestIdannotations in place, you can filter and run specific tests by their IDs - see Test Filtering by ID below.
import com.testomatio.reporter.annotation.TestId;import com.testomatio.reporter.annotation.Title;
public class LoginTests {
    @Test    @TestId("auth-001")    @Title("User can login with valid credentials")    public void testValidLogin() {        // Your test code here    }
    @Test    @TestId("auth-002")    @Title("Login fails with invalid password")    public void testInvalidPassword() {        // Your test code here    }
    @Test    @Title("User sees helpful error message")  // Just title, auto-generated ID    public void testErrorMessage() {        // Your test code here    }}
🥒 For Cucumber
Section titled “🥒 For Cucumber”Use tags to identify your scenarios:
Feature: User Authentication
  @TestId:auth-001  Scenario: Valid user login    Given user is on login page    When user enters valid credentials    Then user should be logged in successfully
  @TestId:auth-002  Scenario: Invalid password login    Given user is on login page    When user enters invalid password    Then login should fail
  @TestId:auth-003  Scenario: Error message display    Given user is on login page    When login fails    Then error message should be displayed
📎 Test Artifacts Support
Section titled “📎 Test Artifacts Support”The Java Reporter supports attaching files (screenshots, logs, videos, etc.) to your test results and uploading them to
S3-compatible storage.
Artifacts handling is enabled by default, but it won’t affect the run if there are no artifacts provided (see options
below).
Configuration
Section titled “Configuration”Artifacts are stored in external S3 buckets. S3 Access can be configured in two different ways:
-
Make configurations on the Testomat.io:
Choose your project -> click Settings button on the left panel -> click Artifacts -> Toggle “Share credentials…”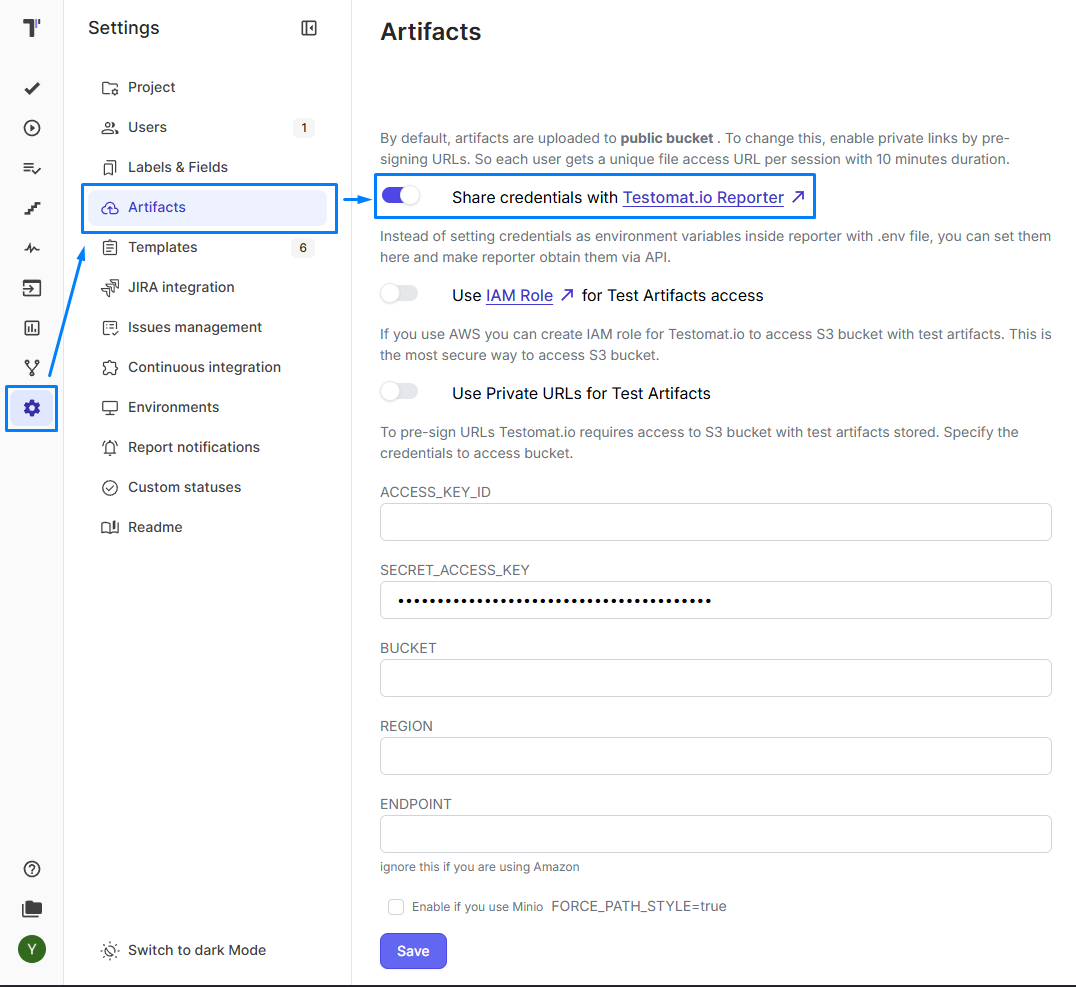
-
Provide options as environment variables/jvm property/testomatio.properties file.
NOTE: Environment variables(env/jvm/testomatio.properties) take precedence over server-provided credentials.
| Setting | Description | Default |
|---|---|---|
testomatio.artifact.disable | Completely disable artifact uploading | false |
testomatio.artifact.private | Keep artifacts private (no public URLs) | false |
s3.force-path-style | Use path-style URLs for S3-compatible storage | false |
s3.endpoint | Custom endpoint to be used with force-path-style | false |
s3.bucket | Provides bucket name for configuration | |
s3.access-key-id | Access key for the bucket | |
s3.region | Bucket region | us-west-1 |
Note: S3 credentials can be configured either in properties file or provided automatically on Testomat.io UI. Environment variables take precedence over server-provided credentials.
Use the Testomatio facade to attach files to your tests.
Multiple files can be provided to the Testomatio.artifact(String ...) method.
import io.testomat.core.facade.Testomatio;
public class MyTest {
    @Test    public void testWithScreenshot() {        // Your test logic
        // Attach artifacts (screenshots, logs, etc.)        Testomatio.artifact(                "/path/to/screenshot.png",                "/path/to/test.log"        );    }}
Please make sure you provide the path to the artifact file including its extension.
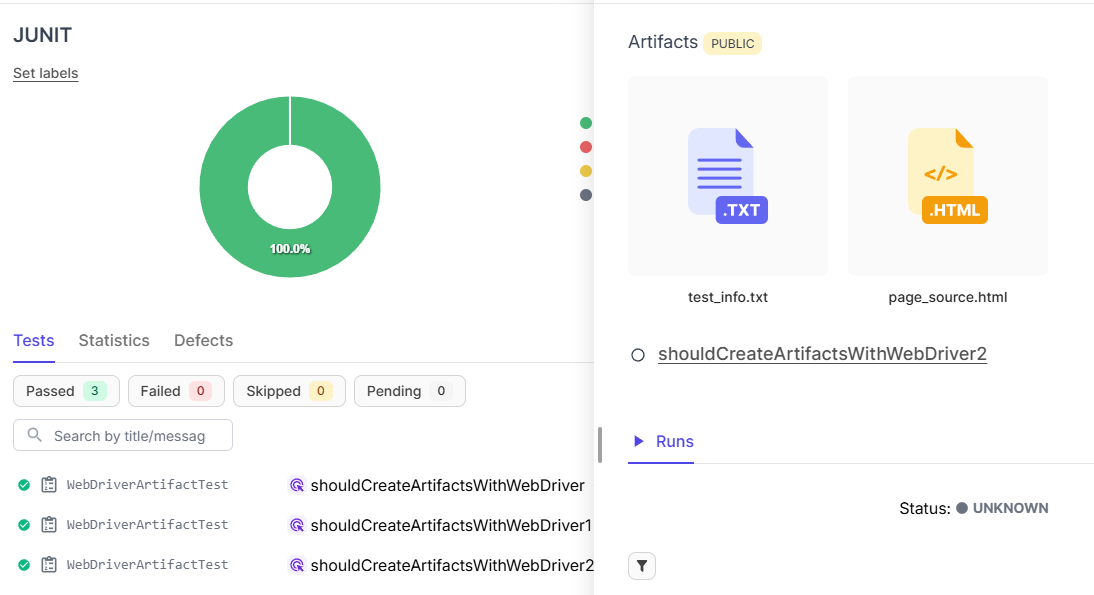
How It Works
Section titled “How It Works”- S3 Upload: Files are uploaded to your S3 bucket with organized folder structure
- Link Generation: Public URLs are generated and attached to test results
- Artifacts are visible at the test info on UI
As a result, you will see something like this in the UI after the run is completed:
📝 Step-by-Step Reporting
Section titled “📝 Step-by-Step Reporting”Track detailed test execution flow using the @Step annotation.
Steps provide granular visibility into test logic and help identify exactly where tests succeed or fail.
Add AspectJ weaver to your test execution via maven-surefire-plugin:
<build> <plugins> <plugin> <groupId>org.apache.maven.plugins</groupId> <artifactId>maven-surefire-plugin</artifactId> <version>3.2.2</version> <configuration> <argLine> -javaagent:"${settings.localRepository}/org/aspectj/aspectjweaver/1.9.24/aspectjweaver-1.9.24.jar" </argLine> </configuration> </plugin> </plugins></build>Basic Usage
Section titled “Basic Usage”Annotate methods with @Step to track their execution:
import io.testomat.core.annotation.Step;
public class LoginTest {
    @Test    public void testUserLogin() {        openLoginPage();        enterCredentials("user@example.com", "password123");        clickLoginButton();        verifyUserLoggedIn();    }
    @Step("Open login page")    private void openLoginPage() {        driver.get("https://example.com/login");    }
    @Step("Enter credentials")    private void enterCredentials(String email, String password) {        driver.findElement(By.id("email")).sendKeys(email);        driver.findElement(By.id("password")).sendKeys(password);    }
    @Step("Click login button")    private void clickLoginButton() {        driver.findElement(By.id("login-btn")).click();    }
    @Step("Verify user is logged in")    private void verifyUserLoggedIn() {        assertTrue(driver.findElement(By.id("user-profile")).isDisplayed());    }}
Parameter Substitution
Section titled “Parameter Substitution”Use placeholders to make step descriptions dynamic:
Indexed placeholders (always work):
@Step("Search for {0} in category {1}")private void search(String query, String category) { // Step will show: "Search for laptop in category electronics"}Named placeholders (require -parameters compiler flag):
@Step("Login as {username} with {password}")private void login(String username, String password) { // Step will show: "Login as admin with secret123"}To enable named placeholders, add to pom.xml:
<plugin> <groupId>org.apache.maven.plugins</groupId> <artifactId>maven-compiler-plugin</artifactId> <configuration> <parameters>true</parameters> </configuration></plugin>What You’ll See
Section titled “What You’ll See”Steps appear in test reports with:
- Step title
- Execution duration
- Order of execution
This provides complete transparency into test flow and helps debug failures quickly.
🎯 Test Filtering by ID
Section titled “🎯 Test Filtering by ID”JUnit & TestNG only
Note: Cucumber tests can be filtered using native Cucumber tags functionality (
@tagin feature files andcucumber.filter.tagsproperty).
Run specific tests by their @TestId values using the -Dids parameter. This is useful for:
- Running smoke tests or critical path tests
- Re-running failed tests from previous runs
- Debugging specific test cases
- CI/CD pipelines with test subsets
Filter tests by comma-separated test IDs:
# Run single testmvn test -Dids=smoke-001
# Run multiple testsmvn test -Dids=smoke-001,smoke-002,smoke-003
# Combine with other parametersmvn test \  -Dids=smoke-001,smoke-002 \  -Dtestomatio=tstmt_your_key \  -Dtestomatio.run.title="Smoke Tests"
Example
Section titled “Example”public class LoginTests {
@Test @TestId("smoke-001") public void testValidLogin() { // This test will run with -Dids=smoke-001 }
@Test @TestId("smoke-002") public void testInvalidPassword() { // This test will run with -Dids=smoke-002 }
@Test public void testOtherFeature() { // This test will be skipped when filtering by IDs }}Behavior
Section titled “Behavior”- Tests without
@TestId: Included when no filter is applied; skipped when-Didsis provided (TestNG only) - Tests with matching IDs: Always run when their ID is in the filter list
- Tests with non-matching IDs: Skipped
💡 Library Usage Examples
Section titled “💡 Library Usage Examples”Basic Usage
Section titled “Basic Usage”# Simple run with custom titlemvn test \ -Dtestomatio=tstmt_your_key \ -Dtestomatio.run.title="My Feature Tests"Team Collaboration
Section titled “Team Collaboration”# Shared run that team members can contribute tomvn test \ -Dtestomatio=tstmt_your_key \ -Dtestomatio.shared.run="integration-tests" \ -Dtestomatio.env="staging"Stakeholder Demo
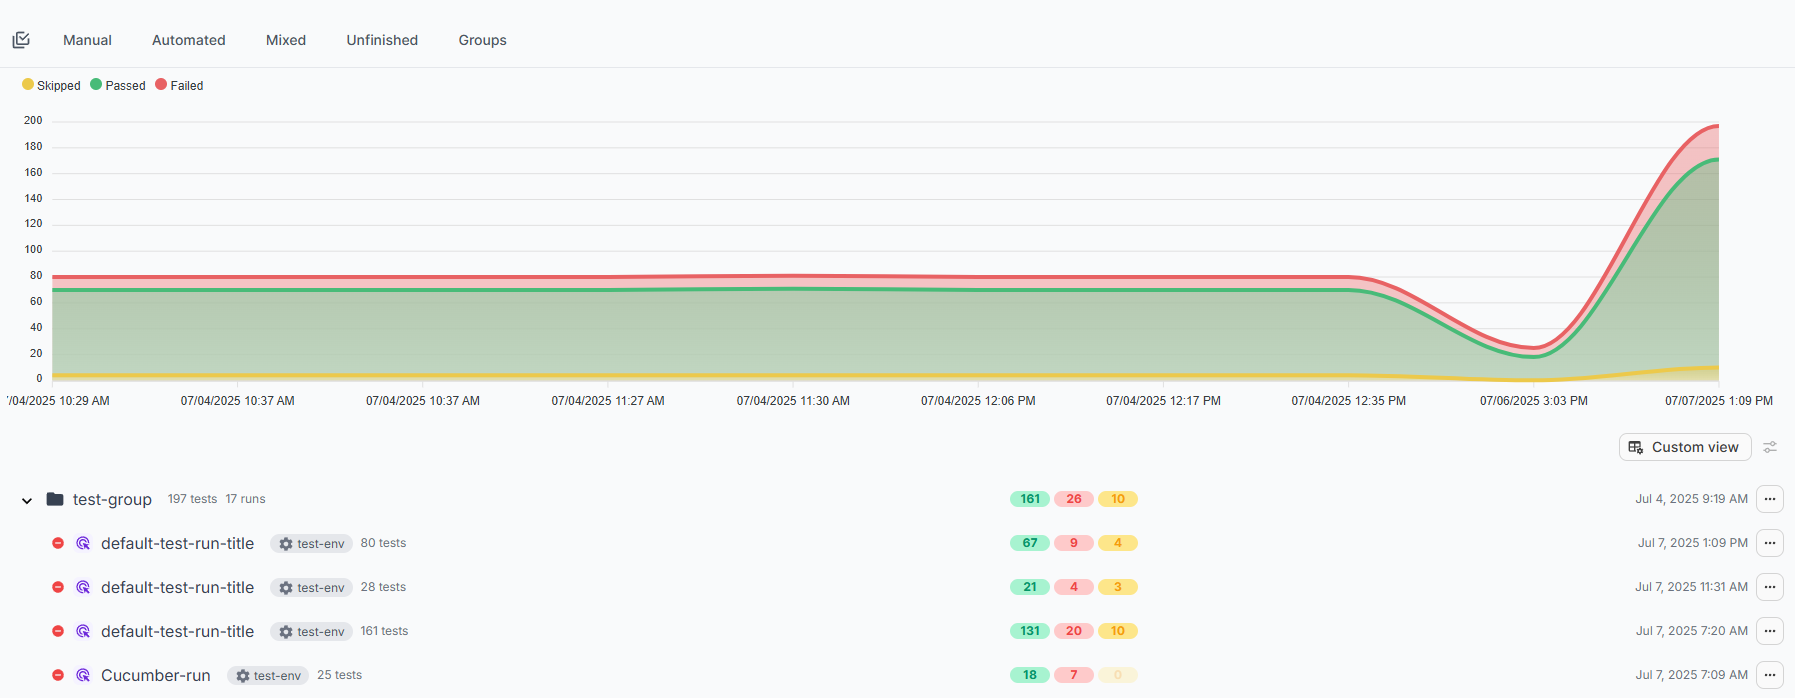
Section titled “Stakeholder Demo”# Public report for sharing with stakeholdersmvn test \ -Dtestomatio=tstmt_your_key \ -Dtestomatio.run.title="Demo for Product Team" \ -Dtestomatio.publish=1📊 What You’ll See
Section titled “📊 What You’ll See”When your tests start running, you’ll see helpful output like this:

You get two types of links:
- 🔒 Private Link: Full access on Testomat.io platform (for your team)
- 🌐 Public Link: Shareable read-only view (only if you set
testomatio.publish=1)
And the dashboard - something like this:
Advanced customization
Section titled “Advanced customization”There are void hooks in the listeners that allow you to customize reporting much more. These hooks are located in the listeners’ tests lifecycle methods according to their names. External API calls, logging, and any custom logic can be added to the hooks. The hooks are executed after the lifecycle method logic finishes and do not replace it.
JUnit, TestNG
Section titled “JUnit, TestNG”-
Complete the Simple Setup first
-
Create a new class that extends JunitListener or TestNgListener, based on your needs. Implement protected methods from the library listener and add custom logic to them.
-
Create the
servicesdirectory:📁 src/main/resources/META-INF/services/ -
Create the right configuration file:
Framework Create this file: JUnit 5 org.junit.jupiter.api.extension.ExtensionTestNG org.testng.ITestNGListener -
Add your custom class path to the file:
com.yourcompany.yourproject.CustomListener
Cucumber
Section titled “Cucumber”- Complete the Simple Setup first
- Create a new class that extends CucumberListener. Implement protected methods from the library listener and add custom logic to them.
- Add
com.yourcompany.yourproject.YOUR_CUSTOM_LISTENERas @ConfigurationParameter value to your TestRunner class. Like this:
@ConfigurationParameter(key = PLUGIN_PROPERTY_NAME, value = "pretty, com.yourcompany.yourproject.YOUR_CUSTOM_LISTENER")🆘 Troubleshooting
Section titled “🆘 Troubleshooting”Tests not appearing in Testomat.io?
Section titled “Tests not appearing in Testomat.io?”- Check your API key - it should start with
tstmt_and be related to the project you’re looking at. - Verify internet connection - the reporter needs to reach
app.testomat.io - Enable auto-creation - add
-Dtestomatio.create=trueto create missing tests
Framework not detected?
Section titled “Framework not detected?”- JUnit 5: Make sure
junit-platform.propertiesexists with autodetection enabled - Cucumber: Verify the listener is in your
@CucumberOptionsplugins - TestNG: Should work automatically if nothing is overridden - check your TestNG version (need 7.x)
Nothing helps?
Section titled “Nothing helps?”- Create an issue. We’ll fix it!
💝 Love this tool? Star the repo and share with your team!